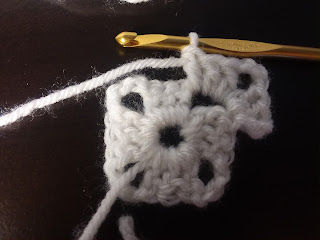
I've uploaded videos in three parts: round one, round two, and round three and beyond.
First, start by chaining five.
Slip stitch into the first chain to make a ring.
Chain three.
Now double crochet twice into the ring. This will make one side of your granny square.
To make a corner, chain three.
Now we want to make side two. Do this by double crocheting three times into the ring.
Make another corner by chaining three and another side by double crocheting three into the ring.
Make your final corner and side by chaining three and double crocheting three.
Now we need to bring it all together. Chain three for the final corner. Then, looking carefully at that very first chain three you did to get away from the ring, you want to slip stitch into the top of that chain.
That's round one! Now on to round two.
Start by chaining three. Again, this gets you far enough away from the previous part to do a double crochet. At this point, I turned my square around so I was looking at the back. This is optional and entirely personal preference.
Look at the big open space of the corner. Double crochet twice into this open space.
We need to turn the corner for this round, too, so chain three.
Double crochet three times into the same open space. That's one corner of this round.
Now we need to skip over this bunch of double crochets so we can get to the next corner. Do this by chaining one.
You've reached a new corner, so double crochet three times into the corner's open space.
Finish this corner by chaining three and double crocheting three more times into the same space.
Chain one so we can reach the next corner. I don't have pictures for the rest of this round, unfortunately.
Do the next two corners the same way as the first two: double crochet three, chain three, double crochet three, and chain one to stretch to the next open space.
When you get back to where you started, look at that very first chain three you did. Slip stitch into the top of that to close the round.
That's round two! Onto round three. This is the last round I have instructions for, but round four, five, six, and so on will all be done the exact same way as round three.
Start once more by chaining three. Again, I turned my project around here, but again that's just personal preference.
You'll notice that now along with all the open space at the corners, there's open space in the sides, too. Start by double crocheting twice into this open side space.
Now we need to get to the corner. Chain one to skip over all of the stitches from the previous round and complete the corner the same way we did before: double crochet three, chain three, and double crochet three more.
Chain one to reach the next open side space and double crochet three times into the open side space.
Chain one to reach the next corner and go all the way around the square like this.
When you get back to where you started, look at the very first chain three you did and slip stitch into the top of it to close the round.
That's round three! If you want to do more rounds, just follow the same directions: every corner gets three double crochets, three chains, and three more double crochets. Every bunch of stitches from previous rounds gets skipped over with one chain. Every side space gets three double crochets. When you're entirely done, cut the yarn (leave a few inches) and pull it all the way through your last stitch.


No comments:
Post a Comment